You can feel it when you bend down or stand up. It’s that groan-inducing aching in your lower back that never seems to go away completely. Lower back pain, often known as lumbago or spondylosis, is one of the most frequent types of chronic pain in adults.
Maybe you’ve been resting, expecting the back discomfort will go away on its own. However, as a better pain relief treatment, most doctors now advise lower back pain patients to stay active and move their backs and related muscles.
Only the appropriate kind of movement can help cure back pain; avoid routines that place too much stress and strain on the back. So, what exercises should you do? This is partly determined by the severity of your pain and its sources of it. As a result, you should always get the advice of your doctor before engaging in any strenuous activity for lower back discomfort.
The slides that follow describe various simple exercises that can help relieve lower back pain, as well as a few activities to avoid. With your doctor’s consent, including these moves into your training regimen can relieve your nagging, daily discomfort and lead to improved overall health.
1. Skip the Toe Touches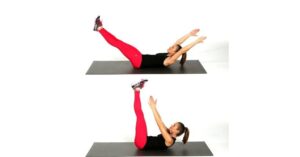
Fitness is frequently an excellent remedy for back pain, but other exercises provide a little health benefit. Toe touches might be harmful to your back. Standing toe touches can cause sciatica and other diseases by overstressing ligaments and spinal disks. Another cause for concern is how standing toe touches might overstretch your hamstrings and lower back muscles.
Mild discomfort and soreness are to be expected while beginning a new training routine. That soreness and stiffness should go away as you work your way back to better health and your muscles strengthen. However, if a fitness regimen creates moderate or severe discomfort symptoms that continue for more than 15 minutes, you should stop exercising and consult your doctor.
2. Partial Crunches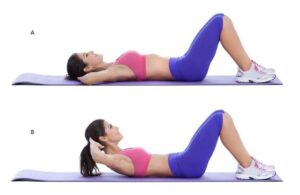
Crunches are beneficial to your back. The half-stomach crunch is a traditional core-strengthening exercise. Partial crunches strengthen your lower back and stomach muscles, making them an excellent workout for persons with spondylosis.
The following is how to maximize the benefits of partial crunches:
• Lie down with your feet flat on the floor and your knees bent.
• Raise your shoulders from the floor, hands behind your head or arms crossing over your chest.
• Maintain a strong grip on your stomach muscles.
• Exhale while lifting your shoulders. Avoid using your elbows to lead (or yanking your neck off the floor with your arms).
• For one second, hold. Then, calmly, lower yourself back to the floor.
• Repeat between eight and twelve times.
• Remember to use good form to avoid severe spine tension.
• Throughout the exercise, keep your feet, tailbone, and lower back against the floor.
3. Skip the Sit-Ups
Sit-ups are a fitness staple, but they aren’t as effective at strengthening your core as you would believe.
Although most individuals think of sit-ups as a stomach-strengthening exercise, they use their hip muscles more than their stomachs when performing this exercise.
Not only are these bad for core strength, but they also put a strain on spinal disks, which can lead to injury by increasing rather than decreasing lower back pain. Try more appropriate workouts, such as those indicated further on, to maintain excellent health and alleviate low back pain.
4. Hamstring Stretches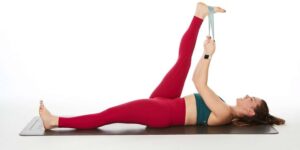
Hamstring stretches relax the muscles in the back of your leg, which assist the lower spine’s work. A towel or workout band can be used to help with this stretch, as indicated in the picture.
Follow these instructions to conduct a hamstring stretch:
• In the beginning, start by lying on your back with a bent knee.
• Next, wrap a towel around the unbent leg’s ball of the foot.
• With your knee straight, gently yank back on the towel to release it.
• You should feel a slight stretch in the back of your leg after doing this exercise.
• Hold the stretch for 15-30 seconds at the very least.
• Repeat five times for each limb.
5. Avoid Leg Lifts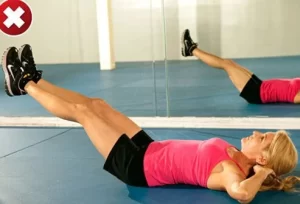
Leg lifts are occasionally recommended as an effective therapy for lower back discomfort. This is because they aid in the development of abdominal muscles, which are essential for back health. Unfortunately, lying on your back and elevating both legs at the same time might aggravate back pain and lead to damage.
Try this modified leg lift for lower back discomfort instead of relying on leg lifts for better spine health:
Begin by lying on your back. One leg should remain straight, while the other should be bent at the knee.
• Next, carefully raise the straight leg about six inches off the ground and hold it there for a few seconds.
• Finally, gradually lower the leg.
• Repeat with the left leg 10 times, then switch to the right leg.
6. Wall Sits
When it comes to relieving low back discomfort, consider some wall sits instead of sitting on the couch. Follow these procedures to perform these wall sits correctly and safely:
• Stand 10 to 12 inches away from the wall with your back to it.
• Lean in carefully until your spine is flat against the wall.
• Slowly slide down the wall until your knees are slightly bent.
• Keep pressing your low back onto the wall.
• Hold until a count of ten, then carefully slide back up the wall. Rep 8 to 12 times more.
7. Press-up Back Extensions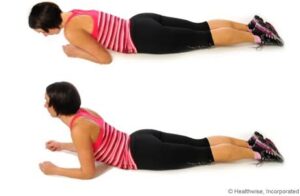
The press-up back extension is another option for people suffering from back pain.
The following are the steps to follow:
• Lie down on your back with your knees bent and your feet flat on the floor. Position your hands directly behind your shoulders and hold on to them firmly.
• Grasp your hands firmly. As your shoulders begin to lift off the floor, you’ve completed the movement.
• Set your elbows directly beneath your shoulders, if you’re able to. After that, hold this position for a few seconds at a time.
8. Bird Dog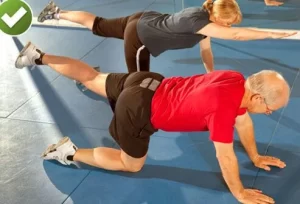
That’s a bird! It’s a canine! No, it’s a low-back pain-relieving workout! A bird dog is an excellent approach to learning to maintain the low back during arm and leg movements. This is how it is done:
• Begin by getting down on your hands and knees.
• Contract your abdominal muscles.
• Lift and stretch one leg behind you while maintaining your hips level.
• Keep that position for five seconds.
• Now switch to the opposite leg.
• Repeat eight to twelve times for each leg. Experiment with holding each lift for longer periods for an extra challenge.
• Lift and extend your opposite arm in front of you for each repetition.
• Do not let your lower back muscles sag.
• Maintain your position by not raising your arms or legs any higher than your low back can support.
9. Knee to Chest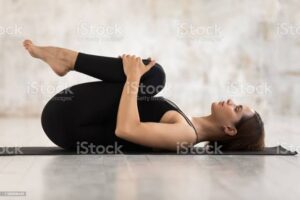
Here’s another approach to get your legs moving as a low back pain remedy. To conduct a safe knee-to-chest workout, follow these steps.
• Lie down on your back. Bend your knees and place your feet flat on the floor.
• Bring your right knee up to your sternum. Maintain a flat left foot on the floor.
• Hold the position for 15-30 seconds. In the meantime, keep your lower back flat on the floor.
• Lower your right knee next. Rep the procedure with your left leg.
• Knee-to-chest two to four times for each leg.
10. Pelvic Tilts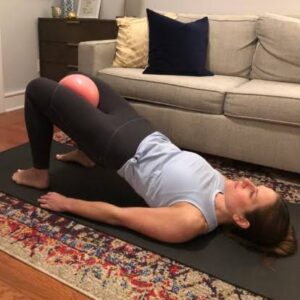
Try resting on your back for some pelvic tilts before your back pain has you writhing on the floor with the normal symptoms. This workout is intended to strengthen your pelvis, which frequently collaborates with the core muscles throughout your spine. By ensuring that your abdomen can do its fair share, your spine discomfort will have one less likely cause.
• Lie on your back and upper body on the floor, knees bent. Maintain a flat foot on the floor.
• Pull your stomach in. Imagine your belly button being dragged against your backbone to maintain your stomach tight.
•This will cause your hips to rock back as your back and spine press into the floor.
•Hold this position for 10 seconds, allowing your air to enter and exit your chest smoothly.
•Repeat the pelvic tilts eight to twelve times.